
JSON Web Tokens (JWT): Essential Guide and Best Practices
In modern applications, especially those using RESTful APIs, security is a top priority. One of the most effective and popular methods to handle authentication and authorization is through JSON Web Tokens (JWT). This article is a complete guide for developers looking to implement JWT efficiently and securely.
What’s a JWT and Why Use It?
A JSON Web Token (JWT) is an open standard (RFC 7519) used to securely transmit information between two parties as a JSON object. A JWT has three main components:
- Header: Describes the type of token and the algorithm used for signing (e.g., HS256).
- Payload: Contains the data you want to transmit, like user ID or permissions.
- Signature: Ensures the token hasn’t been tampered with since it was issued.
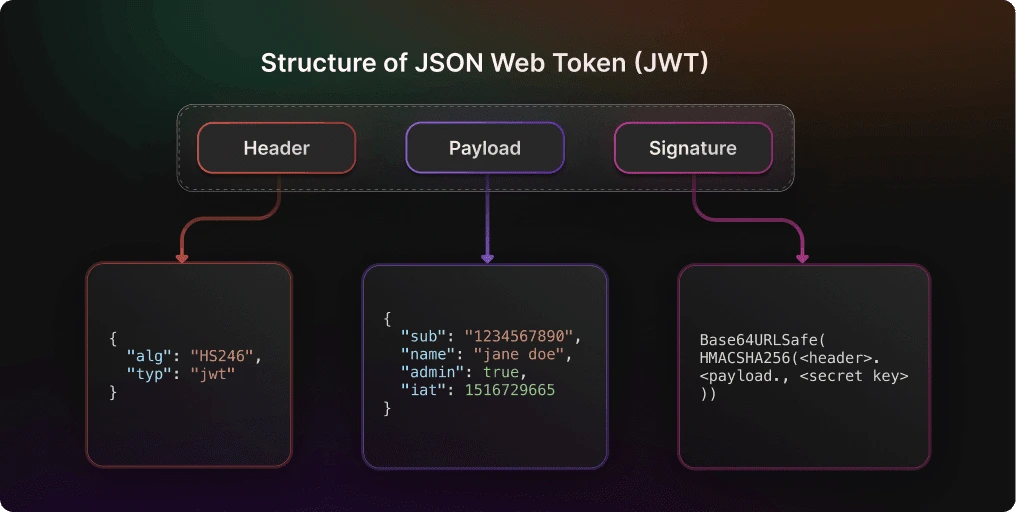
Unlike other authentication methods, JWTs are:
- Stateless: No need to store tokens on the server, reducing storage load.
- Secure: Use signing algorithms (like HMAC or RSA) to ensure token integrity.
- Flexible: Ideal for distributed systems and microservices.
When Should You Use JWT?
JWTs are perfect for applications requiring API authentication. Some common use cases include:
- User authentication in web or mobile apps.
- Stateless session handling in microservice architectures.
- Sharing data between trusted services.
Differences Between JWT and Sessions
While cookies and sessions are traditional methods of authentication, JWTs are better suited for modern apps. The table below highlights the differences:
| Feature | JWT | Sessions |
|---|---|---|
| Storage Model | Token stored on the client (localStorage, sessionStorage, or cookies). | Sessions store an identifier in cookies, with data on the server. |
| Authentication | Stateless (server doesn’t store user info). | Stateful (server stores session data). |
| Scalability | Ideal for distributed systems and microservices. | Less scalable due to server state dependency. |
| Security | Digital signature (HS256, RS256) ensures integrity, but compromised if the secret key is exposed. | Safer in centralized servers since sensitive data isn’t stored on the client. |
| Revocation | Difficult, requires blacklists or short token lifespans. | Easy, simply delete user state on the server. |
| Transport | Can be sent as an Authorization header or stored in cookies. | Uses HTTP cookies for automatic transport. |
Practical Example: Implementing JWT in Node.js
Below is a simple example of JWT authentication in JavaScript using Express.js. Follow this guide to have a protected API with authenticated routes in no time.
Step 1: Project Setup
First, set up a basic Node.js project. This includes initializing the project, installing dependencies, and setting up the environment. We’ll use npm as our package manager and install the following libraries:
mkdir jwt-auth && cd jwt-auth
npm init -y
npm install express jsonwebtoken body-parser dotenv
Create a .env file to store the secret key used for signing and decrypting tokens.
SECRET_KEY=my_super_secure_key
Step 2: Create the Server with Express
Next, configure an Express server. Define routes and connect necessary middlewares, such as JSON data parsing.
require('dotenv').config();
const express = require('express');
const bodyParser = require('body-parser');

// Import routes and middlewares
const authRoutes = require('./routes/auth');
const protectMiddleware = require('./middlewares/protected');

const app = express();
app.use(bodyParser.json());

// Public routes
app.use('/auth', authRoutes);

// Protected route example
app.get('/protected-route', protectMiddleware, (req, res) => {
  res.json({ message: `Welcome, user ${req.user.username}` });
});

app.listen(3000, () => console.log('Server running at http://localhost:3000'));
Step 3: Generate JWT During Login
Login is the entry point for user authentication. When a user successfully logs in, the server generates a JWT token for the client to access protected resources.
Here’s an example login route without using a database. In a real-world scenario, you’d query your database here.
const express = require('express');
const jwt = require('jsonwebtoken');
const router = express.Router();

// Mock user data
const USER = { username: 'developer1', password: '12345', id: 1 };

router.post('/login', (req, res) => {
  const { username, password } = req.body;

  if (username !== USER.username || password !== USER.password) {
    return res.status(401).json({ message: 'Invalid credentials' });
  }

  const token = jwt.sign(
    { userId: USER.id, username: USER.username },
    process.env.SECRET_KEY,
    { expiresIn: '1h' }
  );

  res.json({ token });
});

module.exports = router;
Step 4: Protect Routes with Middleware
Ensure only authenticated users can access specific routes by creating a middleware that validates the token sent in HTTP headers.
const jwt = require('jsonwebtoken');

module.exports = (req, res, next) => {
  const token = req.headers['authorization'];
  if (!token) {
    return res.status(403).json({ message: 'No token provided' });
  }

  try {
    const decoded = jwt.verify(token.split(' ')[1], process.env.SECRET_KEY);
    req.user = decoded;
    next();
  } catch (error) {
    return res.status(401).json({ message: 'Invalid or expired token' });
  }
};
This middleware is applied to the /protected-route in server.js. The middleware validates everything before executing the route’s code.
Step 5: Test Authentication
First, start the Express server:
node server.js
Next, follow this client-server flow to test JWT authentication:
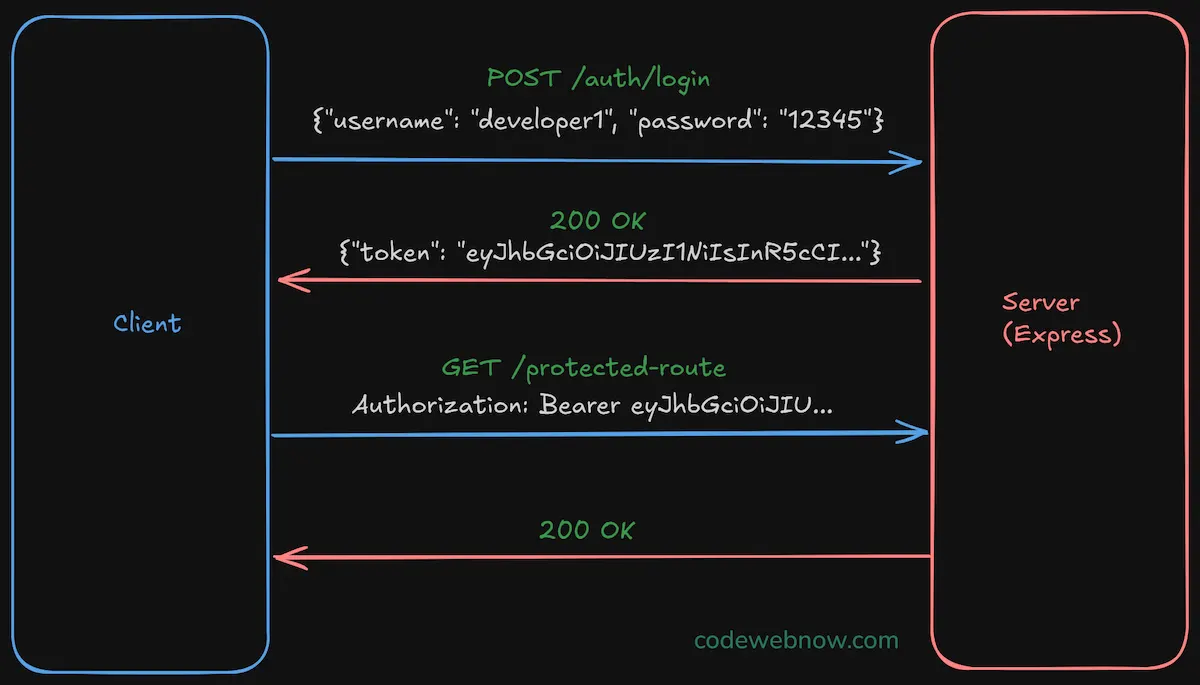
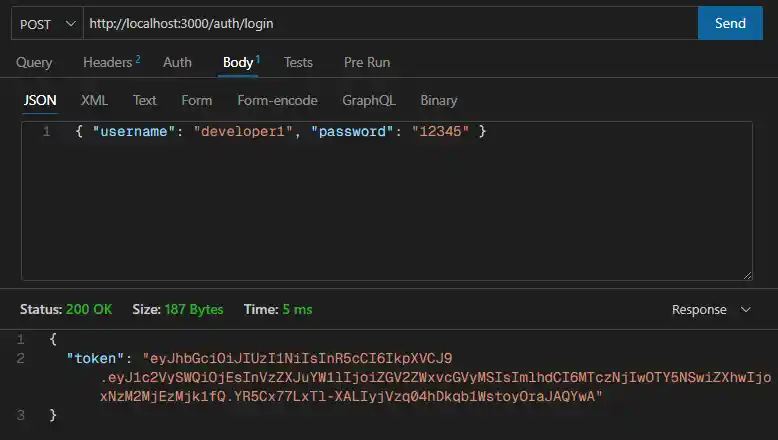
Using tools like Postman or Thunder Client, test the login flow. Send a POST request with {"username": "developer1", "password": "12345"} to /auth/login.
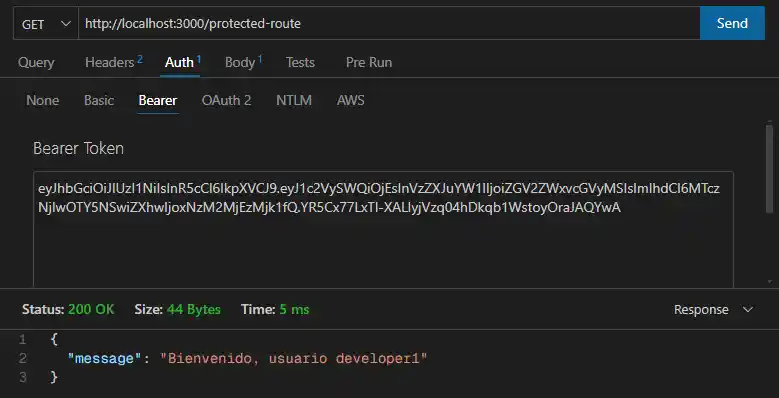
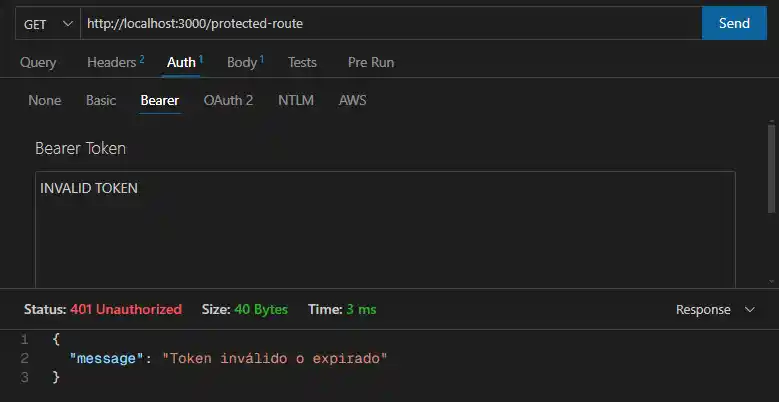
The returned token lets you access protected routes. Send a GET request to /protected-route with the Bearer authentication scheme.
Authorization: Bearer <TOKEN>
You can also test invalid token cases:
Step 6: Best Practices for JWT
- Don’t expose secret keys: Use environment variables and avoid including them in source code.
- Set short token lifetimes: Use reasonable expiration times (
expiresIn). - Implement Refresh Tokens: For long-lived sessions, use a refresh token system to issue new JWTs without requiring login.
- Use HTTPS: Protect data in transit by encrypting connections.
Conclusion
JWT authentication is a robust solution for protecting your RESTful API projects. In this article, you learned:
- What JWT is and how it works.
- How to implement authentication in Node.js step by step.
- Best practices to use JWT securely.
Want to know more about JSON Web Tokens? Check out their official documentation.
You might also be interested in

Complete Guide to MVC in PHP: How it Works and How to Implement It
Learn to implement the MVC pattern in pure PHP without frameworks. Comprehensive breakdown of project structure, routing, controllers, models, and views with examples.